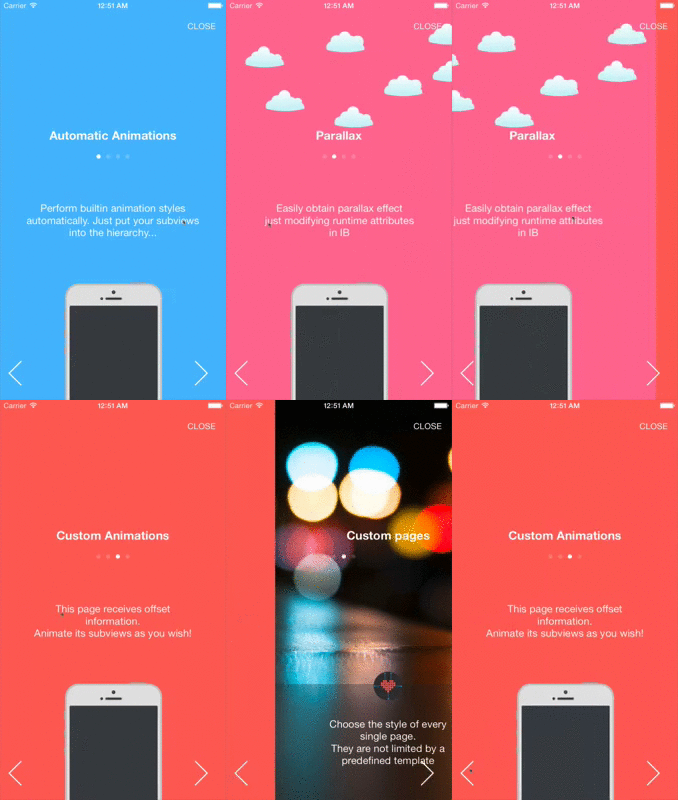
Port of https://github.com/ariok/BWWalkthrough all credits go to Yari D'areglia
Author: Yari D'areglia @Bitwaker
Nuget: https://www.nuget.org/packages/BWWalkthrough
BWWalkthrough (BWWT) is a class that helps you create Walkthroughs for your iOS Apps. It differs from other similar classes in that there is no rigid template; BWWT is just a layer placed over your controllers that gives you complete freedom on the design of your views..
Video preview Here A dedicated tutorial is available on ThinkAndBuild
The class comes with a set of pre-built animations that are automatically applied to the subviews of each page. This set can be easily substituted with your custom animations.
BWWT is essentially defined by 2 classes: BWWalkthroughViewController is the Master (or Container). It shows the walkthrough and contains UI elements that are shared among all the Pages (like UIButtons and UIPageControl).
BWWalkthroughPageViewController defines every single Page that is going to be displayed with the walkthrough inside the Master.
BWWT is not a copy-paste-and-it-just-works class and it is not a fixed walkthrough template. If you need a simple no-configuration walkthrough, BWWT is not the right choice.
BWWalkthrough is available through CocoaPods. To install it, simply add the following line to your Podfile:
pod "BWWalkthrough"Include the Pod/Classes/BWWalkthroughViewController.swift and the Pod/Classes/BWWalkthroughPageViewController.swift files into your project.
Add a new controller to the Storyboard and set its class as BWWalkthroughViewController. This is the Master controller where every page will be attached.
Here you can add all the elements that have to be visible in all the Pages.
There are 4 prebuilt IBOutlets that you can attach to your elements to obtain some standard behaviours: UIPageControl (pageControl), UIButton to close/skip the walkthrough (closeButton) and UIButtons to navigate to the next and the previous page (nextButton, prevButton). You can take advantage of these IBOutlets just creating your UI elements and connecting them with the outlets of the Master controller.
Add a new controller to the Storyboard and set it has BWWalkthroughPageViewController. Define your views as you prefer.
Here is an example that shows how to create a walkthrough reading data from a dedicated Storyboard:
    // Get view controllers and build the walkthrough
    let stb = UIStoryboard(name: "Walkthrough", bundle: nil)
    let walkthrough = stb.instantiateViewControllerWithIdentifier(“Master”) as BWWalkthroughViewController
    let page_one = stb.instantiateViewControllerWithIdentifier(“page1”) as UIViewController
    let page_two = stb.instantiateViewControllerWithIdentifier(“page2”) as UIViewController
    let page_three = stb.instantiateViewControllerWithIdentifier(“page3”) as UIViewController

    // Attach the pages to the master
    walkthrough.delegate = self
    walkthrough.addViewController(page_one)
    walkthrough.addViewController(page_two)
    walkthrough.addViewController(page_three)
You can add animations without writing a line of code. You just implement a new Page with its subviews and set an animation style using the runtime argument {Key: animationType, type: String} via IB. The BWWalkthrough animates your views depending on the selected animation style.
At the moment (WIP!) the possible value for animationsType are: Linear, Curve, Zoom and InOut The speed of the animation on the X and Y axes must be modified using the runtime argument {key: speed type:CGPoint}, while the runtime argument {key: speedVariance type: CGPoint} adds a speed variation to the the subviews of the page depending on the hierarchy position.
Example Let’s say that we have defined these runtime arguments for one of the Pages:
- animationType: “Linear”
- speed: {0,1}
- speedVariance: {0,2}
The subviews of the Page will perform a linear animation adding speed to the upfront elements depending on speedVariance. So if we have 3 subviews, the speed of each view will be:
- view 0 {0,1+2}
- view 1 {0,1+2+2}
- view 2 {0,1+2+2+2}
creating the infamous parallax effect.
You might need to avoid animations for some specific subviews.To stop those views to be part of the automatic BWWalkthrough animations you can just specify a list of views’ tags that you don’t want to animate. The Inspectable property staticTags (available from version ~> 0.6) accepts a String where you can list these tags separated by comma (“1,3,9”). The views indicated by those tags are now excluded from the automatic animations.
Each page of the walkthrough receives information about its normalized offset position implementing the protocol BWWalkthroughPage, so you can extend the prebuilt animations adding your super-custom-shiny-woah™ animations depending on this value (here is a simple example)
func walkthroughDidScroll(position: CGFloat, offset: CGFloat) {
    var tr = CATransform3DIdentity
    tr.m34 = -1/500.0

    titleLabel?.layer.transform = CATransform3DRotate(tr, CGFloat(M_PI)*2 * (1.0 - offset), 1, 1, 1)
}
The BWWalkthroughViewControllerDelegate protocol defines some useful methods that you can implement to get more control over the Walkthrough flow.
@objc protocol BWWalkthroughViewControllerDelegate {
    @objc optional func walkthroughCloseButtonPressed()
    @objc optional func walkthroughNextButtonPressed()
    @objc optional func walkthroughPrevButtonPressed()
    @objc optional func walkthroughPageDidChange(pageNumber:Int)
}
