-
Notifications
You must be signed in to change notification settings - Fork 12.6k
Updating TypeScript in Visual Studio 2017
In Visual Studio 2017, TypeScript updates are applied slightly differently than in Visual Studio 2015, however you can now have multiple TypeScript versions installed and choose specific versions for each of your projects. In this document, we will walk through how to manage your TypeScript version in Visual Studio 2017.
You will need Visual Studio 2017 version 15.2 or later in order to change your TypeScript version. Depending on which version you have, there are slightly different instructions for managing your TypeScript versions. That said, using the latest available version of Visual Studio will provide the best experience.
During installation of Visual Studio 2017 version 15.2, TypeScript 2.2 will be automatically included with the Web, Node.js, Universal Windows, or Mobile JavaScript workloads. TypeScript 2.1 can also be selected from the 'Individual Components' installer page.
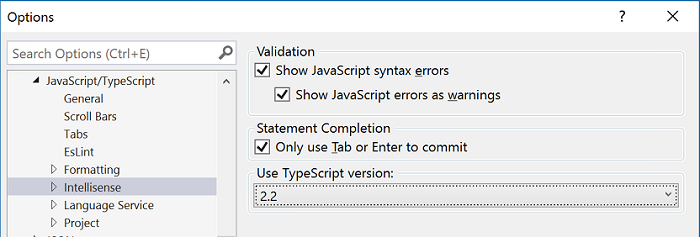
To change TypeScript versions, change the following setting:
- From the top menu bar, open Tools > Options > Text Editor > JavaScript/TypeScript > IntelliSense
- Change Use TypeScript version to your desired version

Don't see the version you're looking for?
Make sure you have downloaded the correct SDK version from the download center.
To change the TypeScript version used for building a project, set the MSBuild property <TypeScriptToolsVersions> in the project file. For more information on MSBuild properties, see the TypeScript Handbook.
In Visual Studio 2017 version 15.2 you are limited to setting a global TypeScript version. This means that if you have two projects that use different TypeScript compiler versions, you will have to manually toggle the setting each time you switch projects. This is not ideal, so if possible, upgrade to Visual Studio 2017 15.3 and follow the instructions below.
In Visual Studio 2017 version 15.3 and later, the TypeScript version used is bound to individual projects.
- Right click on the project node in Solution Explorer
- Click Properties
- Go to the TypeScript Build tab
- Change TypeScript version to the desired version or "use latest available" to always default to the newest version installed

When setting a TypeScript version on a project, the project becomes fixed on the that version. If a new TypeScript version becomes available through a Visual Studio update or a manual SDK download, the project will still use the version it is fixed to. To stay on the latest version, we encourage you to set your projects to "use latest available" as described in step 4 above.
Note! If multiple projects are loaded with different TypeScript versions set in the properties page, the latest TypeScript version of all versions specified will take precedence.
News
Debugging TypeScript
- Performance
- Performance-Tracing
- Debugging-Language-Service-in-VS-Code
- Getting-logs-from-TS-Server-in-VS-Code
- JavaScript-Language-Service-in-Visual-Studio
- Providing-Visual-Studio-Repro-Steps
Contributing to TypeScript
- Contributing to TypeScript
- TypeScript Design Goals
- Coding Guidelines
- Useful Links for TypeScript Issue Management
- Writing Good Design Proposals
- Compiler Repo Notes
- Deployment
Building Tools for TypeScript
- Architectural Overview
- Using the Compiler API
- Using the Language Service API
- Standalone Server (tsserver)
- TypeScript MSBuild In Depth
- Debugging Language Service in VS Code
- Writing a Language Service Plugin
- Docker Quickstart
FAQs
The Main Repo