We read every piece of feedback, and take your input very seriously.
To see all available qualifiers, see our documentation.
Have a question about this project? Sign up for a free GitHub account to open an issue and contact its maintainers and the community.
By clicking “Sign up for GitHub”, you agree to our terms of service and privacy statement. We’ll occasionally send you account related emails.
Already on GitHub? Sign in to your account
spruce 2022/06/15 不用消耗gitee仓库空间啦
以下是如何用javascript get json的请求 注:github api:api.github.com
api.github.com
var url = "index.json";//json链接
var request = new XMLHttpRequest();//新建请求
request.open("get", url);//get获取
request.send(null);//不发送
request.onload = function () {//状态判断
    if (request.status == 200) {
        json = JSON.parse(request.responseText);//这是获取到的信息
    }
}
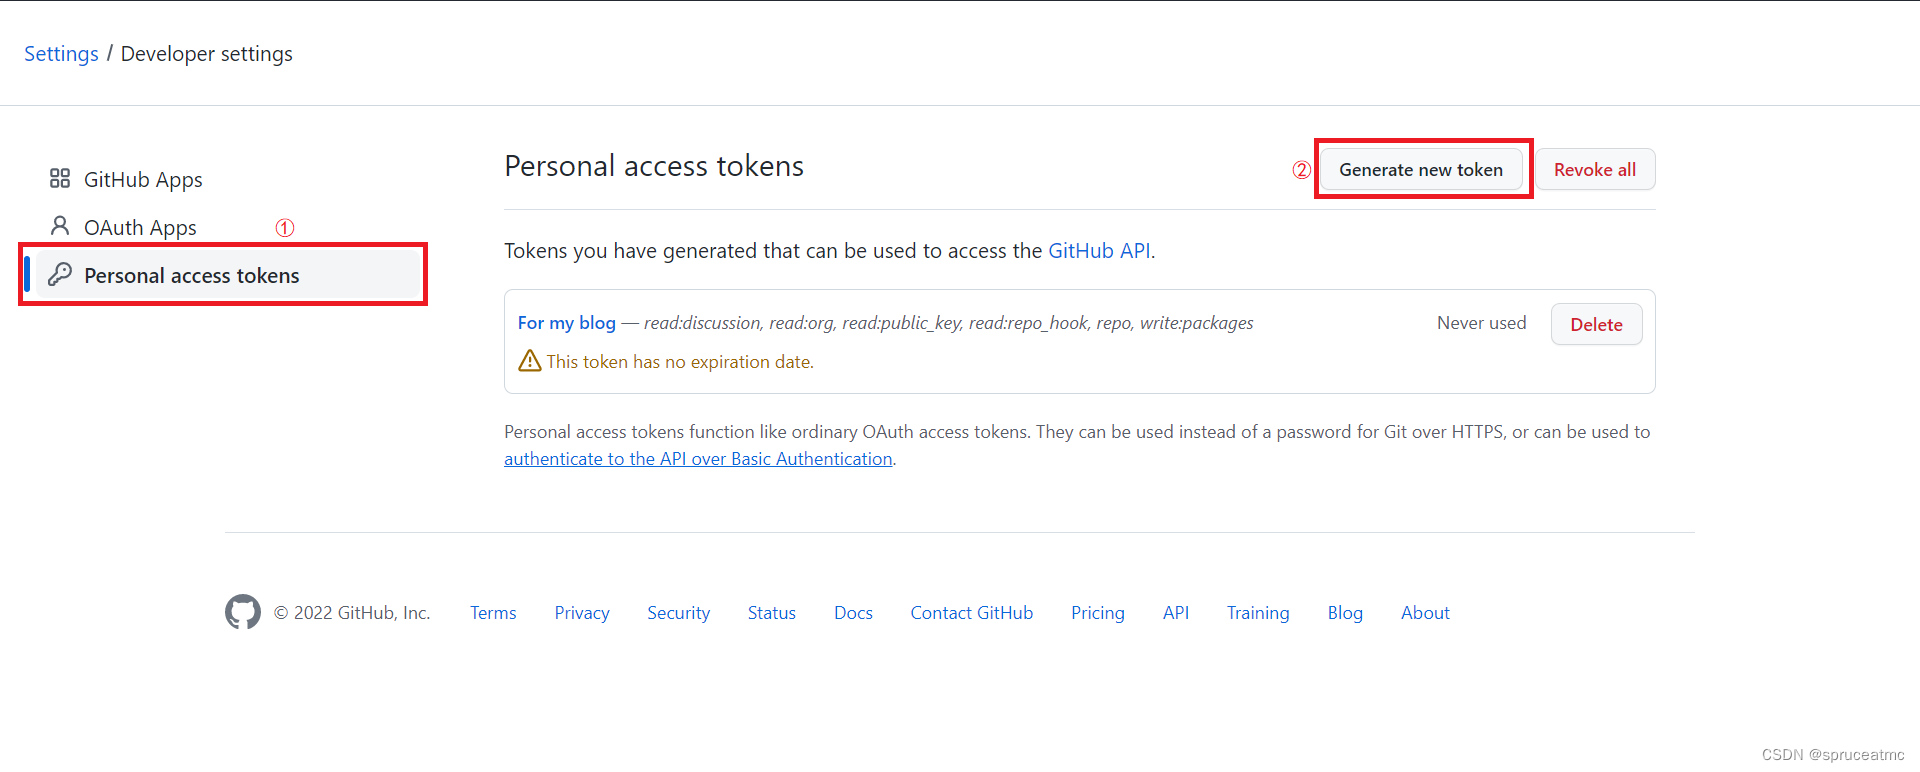
接下来我们去申请一个token 期限可以设置为无限 然后把url改成github链接 https://api.github.com/repos/名字/仓库名字/issues后面加token 获取的数据格式
[ { "url": "https://api.github.com/repos/spruceatmc/spruceblog/issues/1", "repository_url": "https://api.github.com/repos/spruceatmc/spruceblog", "labels_url": "https://api.github.com/repos/spruceatmc/spruceblog/issues/1/labels{/name}", "comments_url": "https://api.github.com/repos/spruceatmc/spruceblog/issues/1/comments", "events_url": "https://api.github.com/repos/spruceatmc/spruceblog/issues/1/events", "html_url": "https://github.com/spruceatmc/spruceblog/issues/1", "id": 1270882799, "node_id": "I_kwDOHgETT85LwCHv", "number": 1, "title": "我的机器人完工啦!", "user": { "login": "spruceatmc", "id": 53632845, "node_id": "MDQ6VXNlcjUzNjMyODQ1", "avatar_url": "https://avatars.githubusercontent.com/u/53632845?v=4", "gravatar_id": "", "url": "https://api.github.com/users/spruceatmc", "html_url": "https://github.com/spruceatmc", "followers_url": "https://api.github.com/users/spruceatmc/followers", "following_url": "https://api.github.com/users/spruceatmc/following{/other_user}", "gists_url": "https://api.github.com/users/spruceatmc/gists{/gist_id}", "starred_url": "https://api.github.com/users/spruceatmc/starred{/owner}{/repo}", "subscriptions_url": "https://api.github.com/users/spruceatmc/subscriptions", "organizations_url": "https://api.github.com/users/spruceatmc/orgs", "repos_url": "https://api.github.com/users/spruceatmc/repos", "events_url": "https://api.github.com/users/spruceatmc/events{/privacy}", "received_events_url": "https://api.github.com/users/spruceatmc/received_events", "type": "User", "site_admin": false }, "labels": [ ], "state": "open", "locked": false, "assignee": null, "assignees": [ ], "milestone": null, "comments": 0, "created_at": "2022-06-14T14:18:22Z", "updated_at": "2022-06-17T11:07:54Z", "closed_at": null, "author_association": "OWNER", "active_lock_reason": null, "body": "# 我的机器人完工啦!\r\n> **spruce** 2022/06/14 _不利用oauth2.0的qq机器人_\r\n\r\n## 我的博客地址:[我的博客,请在原地址查看文档,禁止转载](https://spruceatmc.gitee.io)\r\n### 此框架依附于mirai(本文先介绍mirai console)\r\n#### 1.安装 Java (版本必须 >= 11)我这里用的是JDK18的版本。(下面这些图是我从网上找的)\r\n下载地址:[java下载链接](https://www.oracle.com/java/technologies/javase-downloads.html)\r\n\r\n\r\n下载安装包之后上传到服务器。然后双击运行安装\r\n安装完成后(若环境变量已经配置好可以跳过),打开>>环境变量 \r\n此电脑>右键>属性\r\n\r\n\r\n新建JAVA_HOME变量,并且输入JDK的安装目录(安装目录在安装的时候有。我这个是默认目录,如果更改过记得这里也修改)\r\n\r\n\r\n编辑Path变量把%JAVA_HOME%\\bin;这个变量插入。然后安装java完成~\r\n\r\n\r\n#### 2.从 github下载最新版本的mcl,然后上传到服务器。并解压(windows10自带解压或者其他解压软件)\r\n这里我们是win所以运行mcl.cmd即可,会自己下载关键的文件等待一会儿看到下图就可以了\r\n\r\n\r\n接着,**他会出来登录验证,你把那个链接输入到google chrome,滑块验证,用f12在NetWork有个文件里有信息,填写入跳转的窗口即可**\r\n修改这个文件可以设置自动登录(也可以使用命令添加自动登录、在上图中的情况下输入help可以查看命令)\r\n\r\n\r\n\r\n#### 3.从 [mirai官方论坛](https://mirai.mamoe.net/) 下载插件(去github右边有version,**不要下载源码**,要下载jar部分),放入plugins文件夹\r\n# 最后,运行它,享受成果吧~\r\n", "reactions": { "url": "https://api.github.com/repos/spruceatmc/spruceblog/issues/1/reactions", "total_count": 0, "+1": 0, "-1": 0, "laugh": 0, "hooray": 0, "confused": 0, "heart": 0, "rocket": 0, "eyes": 0 }, "timeline_url": "https://api.github.com/repos/spruceatmc/spruceblog/issues/1/timeline", "performed_via_github_app": null, "state_reason": null } ]
然后通过解析json,然后获取body部分(内容)接着通过https://cdn.bootcss.com/showdown/1.3.0/showdown.min.js解析解析出来的html格式通过innerHTML写入一个divgithub issue的信息就获取成功啦!例子:我的博客
https://cdn.bootcss.com/showdown/1.3.0/showdown.min.js
The text was updated successfully, but these errors were encountered:
No branches or pull requests
如何利用github issue写个人博文
javascript竟然能获取api信息!!!
以下是如何用javascript get json的请求
注:github api:
api.github.com接下来我们去申请一个token

期限可以设置为无限
然后把url改成github链接
https://api.github.com/repos/名字/仓库名字/issues后面加token
获取的数据格式
[ { "url": "https://api.github.com/repos/spruceatmc/spruceblog/issues/1", "repository_url": "https://api.github.com/repos/spruceatmc/spruceblog", "labels_url": "https://api.github.com/repos/spruceatmc/spruceblog/issues/1/labels{/name}", "comments_url": "https://api.github.com/repos/spruceatmc/spruceblog/issues/1/comments", "events_url": "https://api.github.com/repos/spruceatmc/spruceblog/issues/1/events", "html_url": "https://github.com/spruceatmc/spruceblog/issues/1", "id": 1270882799, "node_id": "I_kwDOHgETT85LwCHv", "number": 1, "title": "我的机器人完工啦!", "user": { "login": "spruceatmc", "id": 53632845, "node_id": "MDQ6VXNlcjUzNjMyODQ1", "avatar_url": "https://avatars.githubusercontent.com/u/53632845?v=4", "gravatar_id": "", "url": "https://api.github.com/users/spruceatmc", "html_url": "https://github.com/spruceatmc", "followers_url": "https://api.github.com/users/spruceatmc/followers", "following_url": "https://api.github.com/users/spruceatmc/following{/other_user}", "gists_url": "https://api.github.com/users/spruceatmc/gists{/gist_id}", "starred_url": "https://api.github.com/users/spruceatmc/starred{/owner}{/repo}", "subscriptions_url": "https://api.github.com/users/spruceatmc/subscriptions", "organizations_url": "https://api.github.com/users/spruceatmc/orgs", "repos_url": "https://api.github.com/users/spruceatmc/repos", "events_url": "https://api.github.com/users/spruceatmc/events{/privacy}", "received_events_url": "https://api.github.com/users/spruceatmc/received_events", "type": "User", "site_admin": false }, "labels": [ ], "state": "open", "locked": false, "assignee": null, "assignees": [ ], "milestone": null, "comments": 0, "created_at": "2022-06-14T14:18:22Z", "updated_at": "2022-06-17T11:07:54Z", "closed_at": null, "author_association": "OWNER", "active_lock_reason": null, "body": "# 我的机器人完工啦!\r\n> **spruce** 2022/06/14 _不利用oauth2.0的qq机器人_\r\n\r\n## 我的博客地址:[我的博客,请在原地址查看文档,禁止转载](https://spruceatmc.gitee.io)\r\n### 此框架依附于mirai(本文先介绍mirai console)\r\n#### 1.安装 Java (版本必须 >= 11)我这里用的是JDK18的版本。(下面这些图是我从网上找的)\r\n下载地址:[java下载链接](https://www.oracle.com/java/technologies/javase-downloads.html)\r\n\r\n\r\n下载安装包之后上传到服务器。然后双击运行安装\r\n安装完成后(若环境变量已经配置好可以跳过),打开>>环境变量 \r\n此电脑>右键>属性\r\n\r\n\r\n新建JAVA_HOME变量,并且输入JDK的安装目录(安装目录在安装的时候有。我这个是默认目录,如果更改过记得这里也修改)\r\n\r\n\r\n编辑Path变量把%JAVA_HOME%\\bin;这个变量插入。然后安装java完成~\r\n\r\n\r\n#### 2.从 github下载最新版本的mcl,然后上传到服务器。并解压(windows10自带解压或者其他解压软件)\r\n这里我们是win所以运行mcl.cmd即可,会自己下载关键的文件等待一会儿看到下图就可以了\r\n\r\n\r\n接着,**他会出来登录验证,你把那个链接输入到google chrome,滑块验证,用f12在NetWork有个文件里有信息,填写入跳转的窗口即可**\r\n修改这个文件可以设置自动登录(也可以使用命令添加自动登录、在上图中的情况下输入help可以查看命令)\r\n\r\n\r\n\r\n#### 3.从 [mirai官方论坛](https://mirai.mamoe.net/) 下载插件(去github右边有version,**不要下载源码**,要下载jar部分),放入plugins文件夹\r\n# 最后,运行它,享受成果吧~\r\n", "reactions": { "url": "https://api.github.com/repos/spruceatmc/spruceblog/issues/1/reactions", "total_count": 0, "+1": 0, "-1": 0, "laugh": 0, "hooray": 0, "confused": 0, "heart": 0, "rocket": 0, "eyes": 0 }, "timeline_url": "https://api.github.com/repos/spruceatmc/spruceblog/issues/1/timeline", "performed_via_github_app": null, "state_reason": null } ]然后通过解析json,然后获取body部分(内容)
接着通过
https://cdn.bootcss.com/showdown/1.3.0/showdown.min.js解析解析出来的html格式通过innerHTML写入一个div
github issue的信息就获取成功啦!
例子:我的博客
The text was updated successfully, but these errors were encountered: