-
Notifications
You must be signed in to change notification settings - Fork 5
Getting Started
The Map Suite VectorMap.js illustrated "GettingStarted" Guide will guide you through the process of creating a sample application and will help you become familiar with Map Suite SDKs. It will show you how to create a beautiful map embedded in a HTML page using VectorMap.js.
 Download Sample Code from GitHub
You can use any text editor that allows you to edit plain text files; such as Notepad on Windows or TextEdit on Mac. An editor which has the helpful indentations, code coloring, autocomplete and text alignment options would be optimal. Here are a few suggested editors:
- Sublime Text (Mac, Windows, Linux)
- Atom (Mac, Windows, Linux)
- Visual Studio Code (Mac, Windows, Linux)
- WebStorm (Mac, Windows, Linux)
The official guide assumes intermediate level knowledge of HTML, CSS, and JavaScript, and have some experience of any front-end development editor, such as Visual Studio Code, Webstorm, Sublime Text or some similars. if you are totally new to frontend development, the easiest way to try out this library which is the "Hello World" example on CodePen. Feel free to open it in another tab and follow along as we go through some features.
Load from CDN in your project:
<!-- style sheet for vectormap.js -->
<link rel="stylesheet" href="https://cdn.thinkgeo.com/vectormap-js/2.0.0/vectormap.css"></link>
<!-- latest minified version of vectormap.js -->
<script src="https://cdn.thinkgeo.com/vectormap-js/2.0.0/vectormap.js"></script>- Install the package:
npm i vectormap-js
Development Version
npm i vectormap-js-dev
- Include it to your page:
<!-- style sheet for vectormap.js -->
<link rel="stylesheet" href="path/to/dist/vectormap.css"></link>
<!-- latest minified version of vectormap.js -->
<script src="path/to/dist/vectormap.js"></script>Set up a basic map with VectorMap.js in 6 steps (here take Visual Studio Code for example).
Step 1. Create a html page with name "index.html"
Step 2. In the <head>of your HTML page, import the vectormap.js and related css file.
<!-- style sheet for vectormap.js -->
<link rel="stylesheet" href="https://cdn.thinkgeo.com/vectormap-js/2.0.0/vectormap.css"></link>
<!-- latest minified version of vectormap.js -->
<script src="https://cdn.thinkgeo.com/vectormap-js/2.0.0/vectormap.js"></script>
Step 3. In the <body> of your HTML page, add a div with "id="map"".
<div id="map" style="width:800px;height:600px;"></div>Step 4. At the bottom of the html page, add a JavaScript section to create an instance of map control with one vector layer created.
<script>
var worldstreetsStyle = "http://cdn.thinkgeo.com/worldstreets-styles/1.0.0/light.json";
var worldstreets = new ol.mapsuite.VectorTileLayer(worldstreetsStyle,
{
apiKey:'your-ThinkGeo-Cloud-Service-key'
});
let map = new ol.Map({
layers: [worldstreets],
target: 'map',
view: new ol.View({
center: ol.proj.fromLonLat([-96.79620, 32.79423]),
zoom: 4,
}),
});
</script>
NOTE:
-
ThinkGeo Cloud Service key
Access to ThinkGeo Cloud services, including Vector Tile data, requires an
API Keythat connects API requests to your account, Please check here on how to create your ownThinkGeo Cloud Service keyFOR FREE. - World Streets Styles
StyleJSONis a syntax of map styling language, similar to CSS. It's define the styles of your vector data.Map Suite World Streets Stylesis professionally designed map styles from ThinkGeo experts, you can use it in your application without any changes, if you are consuming the Vector Tile data from ThinkGeo Cloud Service.
Step 5 (Option). If Map Suite World Streets Styles is referenced in your demo, please load ThinkGeo Map Icons as an requirement, as all icons are drawn with.
<script src="https://cdn.thinkgeo.com/vectormap-icons/1.0.0/webfontloader.js"></script>
<script>
WebFont.load({
custom: {
families: ["vectormap-icons"],
urls: ["https://cdn.thinkgeo.com/vectormap-icons/1.0.0/vectormap-icons.css"]
}
});
</script>
After all the above steps completed, your HTML page should be:
<!DOCTYPE html>
<html>
<head>
<title>Vector World Map</title>
<meta charset="utf-8">
<meta name="viewport" content="width=device-width, initial-scale=1">
<!-- style sheet for vectormap.js -->
<link rel="stylesheet" href="https://cdn.thinkgeo.com/vectormap-js/2.0.0/vectormap.css"></link>
<!-- latest minified version of vectormap.js -->
<script src="https://cdn.thinkgeo.com/vectormap-js/2.0.0/vectormap.js"></script>

<!-- option: Map Suite World Streets Styles -->
<script src="https://cdn.thinkgeo.com/vectormap-icons/1.0.0/webfontloader.js"></script>
<script>
WebFont.load({
custom: {
families: ["vectormap-icons"],
urls: ["https://cdn.thinkgeo.com/vectormap-icons/1.0.0/vectormap-icons.css"]
}
});
</script>
</head>
<body>
<div id="map" style="width:800px;height:600px;"></div>
<script>
var worldstreetsStyle = "https://cdn.thinkgeo.com/worldstreets-styles/1.0.0/light.json";
var worldstreets = new ol.mapsuite.VectorTileLayer(worldstreetsStyle,
{
apiKey:'your-ThinkGeo-Cloud-Service-key' // please go to https://cloud.thinkgeo.com to create
});
let map = new ol.Map({
layers: [worldstreets],
target: 'map',
view: new ol.View({
center: ol.proj.fromLonLat([-96.79620, 32.79423]),
zoom: 4,
}),
});
</script>
</body>
</html>
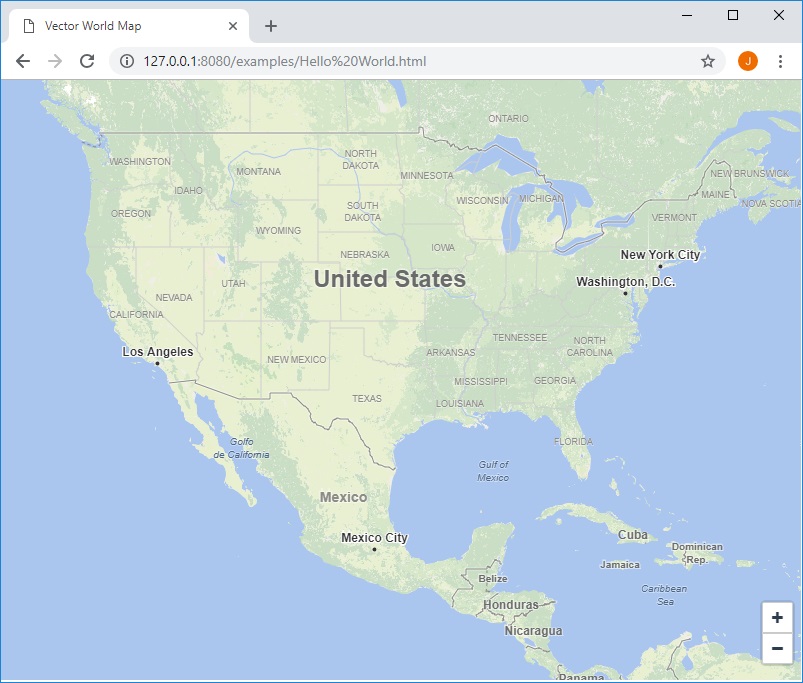
Step 6. Run "index.html" page and a beautiful map is there.
