This repo serves to demonstrate how networking works in Docker. A simplified version of Lab 2 is implemented as an example. We have a front-end server (see front_end.py and Dockerfile.front_end) where only lookup by item_id is implemented. We also have a catalog server (see catalog.py and Dockerfile.catalog) where query by item_id is implemented.
Open the folder containing this repo in your shell, then build the catalog server docker image using
docker build . -f Dockerfile.catalog -t catalogAfter the image is built successfully, run it
docker run catalogTo see the running instance of catalog, run docker ps. You should see something like this:
$ docker ps
CONTAINER ID        IMAGE               COMMAND                 CREATED             STATUS              PORTS               NAMES
ad3acfab9d7c        catalog             "python catalog.py"     4 seconds ago       Up 3 seconds        80/tcp              dreamy_pascal
Notice the dreamy_pascal in the last column, this is a randomly generated name of the instance we just started using the catalog image. A container image can have multiple running instances. This is similar to the relationship between class and object in OOP.
We can see the detail of this instance using docker inspect dreamy_pascal (remeber to replace dreamy_pascal with your instance name). The command should have some output like this:
$ docker inspect dreamy_pascal
# other outputs
"Networks": {
    "bridge": {
        "IPAMConfig": null,
        "Links": null,
        "Aliases": null,
        "NetworkID": "fe43fbf079df8eab4b6cbf731f481849074066c5ee3ba357cae3b423bec31d1c",
        "EndpointID": "cd6ce1140811bdd7b361070fe7d206c3db6c5d88e44bd2a3fe174c784e983651",
        "Gateway": "172.17.0.1",
        "IPAddress": "172.17.0.2",
        "IPPrefixLen": 16,
        "IPv6Gateway": "",
        "GlobalIPv6Address": "",
        "GlobalIPv6PrefixLen": 0,
        "MacAddress": "02:42:ac:11:00:02",
        "DriverOpts": null
    }
}
# other outputs
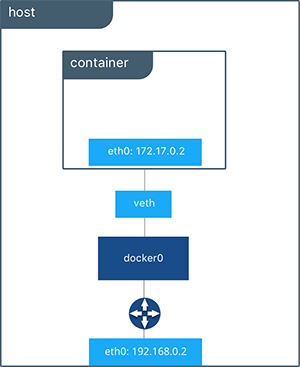
The output here show that our catalog server is running using a bridge network, which is the default network driver of docker. Below is a graph showing how our current network look like:
Note that there is a NAT between the docker0 bridge and host eth0. This makes the container IP address 172.17.0.2 only accessible from the host. If you are using linux, you can try to access the catalog container using curl or httpie:
$ http get 172.17.0.2/query/1001
HTTP/1.0 200 OK
Content-Length: 65
Content-Type: application/json
Date: Tue, 23 Apr 2019 02:29:03 GMT
Server: Werkzeug/0.15.2 Python/3.7.3

{
    "data": {
        "name": "RPCs for Dummies",
        "price": 14.99,
        "quantity": 10
    }
}
For students using Windows/OS X: However, if you are running Windows or Mac OS X, chances are that you won't have luck getting the above result. This is because docker runs containers inside a VM on Windows and OS X, which makes the 'host' of the container the VM rather than your computer running the VM. Therefore you cannot access the container using shell outside the VM. It's a very tricky issue specific to Windows/OS X so I strongly recommend developing dockerized applications on Linux.
Another option is ro run your own Linux VM on Windows/OS X and then run docker inside it. By running your VM you can SSH into the VM and do whatever you like. So you can actually run the command above in a shell inside the VM. I usually use Vagrant whick makes creating development VM and SSHing into the VM a breeze. I have included a Vagrantfile in this repo and you can try creating a VM uisng it.
For the following steps, I'm going to assume you are either using Linux or a Linux Vagrant box.
Similarly, build the front-end server image using
docker build . -f Dockerfile.front_end -t front_endIf you read the code of our front-end server, you will notice that we use an envrionment variable to pass the catalog server address to the front-end server. So we need to set the envrionment variable using the -e option when running our front-end server:
docker run -e CATALOG_ADDRESS=172.17.0.2:80 front_endAgain, check the IP address of the front-end server instance we just started usingdocker ps and docker inspect:
$ docker inspect sad_nightingale

"Networks": {
    "bridge": {
        "IPAMConfig": null,
        "Links": null,
        "Aliases": null,
        "NetworkID": "fe43fbf079df8eab4b6cbf731f481849074066c5ee3ba357cae3b423bec31d1c",
        "EndpointID": "ebc0a74e3927b6390a4eb3d4ac6e6ca1958afc2bbfff8adce11908814ea0dc39",
        "Gateway": "172.17.0.1",
        "IPAddress": "172.17.0.3",
        "IPPrefixLen": 16,
        "IPv6Gateway": "",
        "GlobalIPv6Address": "",
        "GlobalIPv6PrefixLen": 0,
        "MacAddress": "02:42:ac:11:00:03",
        "DriverOpts": null
    }
}
Check if the communication between front-end server and catalog database is working:
$ http get 172.17.0.3/lookup/1001
HTTP/1.0 200 OK
Content-Length: 65
Content-Type: application/json
Date: Tue, 23 Apr 2019 02:52:44 GMT
Server: Werkzeug/0.15.2 Python/3.7.3

{
    "data": {
        "name": "RPCs for Dummies",
        "price": 14.99,
        "quantity": 10
    }
}
This is working fine because front-end server and catalog server are in the same bridge network (behind the same NAT).
Now we try to mock an actual distributed system by running front-end server and catalog server on two different machines. Remember the container is behind an NAT and can only be accessible from the host. How can we make application on other machine to communicate this container? The easiest way is to use the port forwarding function of Docker by adding an -p option to your docker run command. Let's say you want to run the catalog server on 10.0.2.15 and front-end server on 10.0.2.16.
On 10.0.2.15 you can run
docker run -p 8080:80 catalogThe -p 8080 option makes any incoming traffic to port 8080 forwarded to the port 80 of our container, where our catalog server is running on. Note that even if you want to keep port 80, you still need the -p option: you just do -p 80:80 instead. Remember that -p is needed to access a container from oterh machine.
Then on 10.0.2.16, you can start the front-end server. Keep two things in mind here 1) the -p option because an web server usually need to be accessible from other machines, and 2) change the CATALOG_ADDRESS to host_ip:host_port instead of the ip address and port in the bridge network. In this case, we can use
docker run -p 8000:80 -e CATALOG_ADDRESS=10.0.2.15:8080 front_endNow we are all set! We can access our front-end server using the address 10.0.2.16:8000.
$ http get 10.0.2.16:8000/lookup/1002
HTTP/1.0 200 OK
Content-Length: 91
Content-Type: application/json
Date: Tue, 23 Apr 2019 03:08:47 GMT
Server: Werkzeug/0.15.2 Python/3.7.3

{
    "data": {
        "name": "Xen and the Art of Surviving Graduate School",
        "price": 9.99,
        "quantity": 5
    }
}